Thursday, February 27, 2014

Echo Arms Essential 870 Accessory


A new batch born. Echo Arms will soon have these picatinny rail mag extension clamps available for sale, essential for your 870 with a 1" diameter mag extension. This will stay tight on your boomstick even if the bolts are gone. Made in the US of A.


[Click on image to enlarge]

Echo Arms has other projects in the works, so stay posted.

Saturday, February 15, 2014

CMP M1 Pig Sticker


A package on my doorstep, I wonder what's in it? Must be from Italy, fra-gi-le bay-o-net. I had received my CMP M1 bayonets a month after placing my order. I ordered part # PB004UFH, described as:

Bayonets, Model M1 w/scabbard UNION FORK AND HOE MFG.

Used Model M1 bayonets. These bayonets were originally produced as model M1, 10" in length. Bayonets and scabbards are used, exhibiting scratches, dents, dings & rust. Blade, button & handle of bayonet are not broken and no parts are missing. The scabbard may be foreign manufacture, discolored, painted & cut down to match bayonet length. Bayonet and scabbard show expected wear for age of item.


Two bayonets at $65 each + $10 shipping, one month wait, no complaints from me. Obviously I immediately unpacked them and, of course, they were drenched in cosmoline. The first bayonet looked like it had never been used, it had definitely never been sharpened and was in excellent shape, while the second had been used, sharpened, and was more desirable to me personally. 

Now let the clean up begin! On the CMP forum there are many different recommendations on how to clean your new acquisition; from mineral spirits, to boiling hot water, use your wife's hair dryer (come on, I know better than to do that), soak it in WD-40, and so on. However, I kept it simple and took the advice of one post I read, using just paper towels with the addition of cotton swabs and a light application of Breakfree CLP upon reassembly. It took about 30 minutes to thoroughly clean each bayonet. This is a messy job, but someone's got to do it, so get some gloves, paper towels, cotton swabs, and a flat head screwdriver. I also prepped my workspace by laying down some packaging paper, easily roll it up and toss it when you're done.


[1] Disassemble the bayonet


To remove the bayonet from the scabbard, simply depress the catch button and retract.


Locate the center screw on the grip and rotate counter-clockwise, lefty loosy. This will allow you to remove the grip to access the internals.


There it is! The second one was actually worse, cosmoline mixed with sand. 


To remove the lever; [1] depress and continue holding the catch button in, [2] push the bayonet lug catch down and out of the mortise/pommel, [3] then push the lever out from the side shown above. The lever will then freely drop onto your workspace.


I then used the lever to remove the catch button spring.


[2] The clean up 


As stated, paper towels and cotton swabs will easily get the job done. As far as the scabbard, I only cleaned off the throat of the locket and any cosmo located on the exterior. I did not have anything available to swab the inside and as long as there was only cosmo, a preservative, why bother attempting to remove it. 


[3] Reassemble the bayonet


I applied a light coat of Breakfree CLP to the interior parts, wiped off the excess, and then reassembled. Reassembly is not complicated, just go in reverse order; insert spring, insert catch button, insert lever (depress & hold the catch button, locate the correct side of the tang that the lever fits with the circular rotation groove, mate the lever with the hole on the catch button, slide the lug catch up into the mortise/pommel, release the catch button), place the grip parts in the correct position, and reinstall the center crew. Do not over tighten the center screw. 


Final notes. The CMP is alive and well, so join today! You will have to provide proof of US citizenship, club affiliation, and some form of marksmenship or safety certification. I joined the GCA for $25 to fulfil the club affiliation requirement and then used my HSC for the cert requirement. The HSC is a card you receive after passing the test that is given for any & all handgun purchases in CA, good for 5 years. I faxed in all my info and received an email confirmation, then freely proceeded to purchase anything of interest. I have some ammo on order too, but I have no idea when it'll arrive. If you need something in a timely manner, I suggest you use an alternate vendor. If you have the patience, it's nice to have something show up on your doorstep unexpectedly, basically a surprise gift to yourself. That's one way to look at it, right? 

Saturday, February 8, 2014

Grease up your FCG?!?!

Rule of thumb, keep your AR15 lubed up and she will keep pumping lead downrange without a hiccup... in an ideal world. I use Breakfree CLP (and you have your go-to lube, so if it works for you, keep using it), but what about grease, do I really need it and should I use it on the FCG in my AR15? I use Lubriplate 130-A MIL, though cheap wheel bearing (hi temp) grease from your local automotive parts shop should be more than sufficient, on my M1A and on my AK platforms, basically anywhere that there is metal on metal contact, so why not on my AR15s?

I recently got a QMS trigger from ALG Defense and the kit included a diagram of the FCG that had call-outs that specified where grease should/could be applied. And those areas were, of course, points of metal on metal contact. In fact, the packaged QMS hammer had a dollop of grease applied on one of the lubrication points noted in the diagram.

Nothing new to the table here, just wanted to post the diagram on the interwebz as it's usually frowned upon to use grease on an AR15 and, if brought up, the topic almost always revolves around all the usual lube suspects. And, yes, the topic has been debated to death....


[Click on image to enlarge]

About the QMS trigger; an excellent, cost effective upgrade with a very crisp, clean break. This is not a match trigger, so don't expect a 3.5lb - 4lb pull weight. From ALG's website:

The pull of the QMS is very similar to a standard mil-spec trigger, however the majority of the associated grittiness of the stock trigger pull has been removed while the well known reliability of a stock trigger remains. The pull weight is not lower than the M4/M16 minimum weight specification of 5.5lbs.

If you are currently working on a new build (come on, we all are, whether it's in your head or a reality) and debating what trigger to get without breaking the bank, buy a triggerless LPK and get the ALG QMS. You will not be disappointed.

ALG's parent company is Geissele... 'nuff said.

Final notes. Following is a good post from ARFCOM that covers most of the lube points on your AR15. Note that 'G' stands for 'Generous' and not grease.

Update 09/22/14: Today I took out one of my firearms with an ALG QMS FCG that I had greased up the night before (with white lithium grease). I had, what I would say, were two negligent discharges over the course of the day. Now even though the firearm was pointed downrange and the shots did strike the target I was shooting at, they were not intentionally fired. Sending a round downrange should be done with purpose and control, and these shots did not exhibited purpose or control, thus, negligent discharges. Each was after the trigger reset for follow-up shots, an observer probably would not have noticed the difference between a reg shot or the ND, but the slightest movement sent a round. I had approximately 100 ends on this QMS FCG. After returning from the range, I stripped down my firearm and inspected my FCG. I removed all the grease and do not plan on applying it on this particular FCG again. Other than that, a decent day of shooting, but NDs are no ****ing joke and definitely pissed me off. Consistency, purpose & control, that's what I want to achieve each time I go to the range... ha, don't we all.

So, this evening, while still somewhat disgruntled about the NDs that I attributed to my personal actions or complacency behind the trigger, I performed a trigger function check and was able to replicate the FCG reset failure or doubling. I have contacted ALG and look forward to their response. I have already replaced the FCG with another QMS FCG (that I had on hand) and performed a function check that passed without issue.

This morning, 09/23/14, after sending an email to ALG yesterday, I received an email from ALG stating they were going to immediately send out a new QMS trigger and would include a stamped envelope so that I could send back the faulty trigger group. Top notch customer service.

09/26/14 I received my replacement and installed it. FCG checked out. I mailed back the failed FCG.

10/3/14 ALG responded to my inquiry regarding the problematic FCG after receiving it, their response:

I did receive the QMS trigger yesterday. The reason why you were having an issue with it was because the nose of the trigger was rounded over. When this happens, double firing is not uncommon.

Monday, February 3, 2014

M1A Bipod Rail Installation (Fiberglass Stock)

I picked up another Sadlak accessory (this is where they get you!) for my trusty M1A, their front picatinny rail. I have a fiberglass stock and ordered accordingly. They have multiple options, not only based on stock type, but also have a front rail with or without a QD post. I chose the latter as I already have a QD adapter for my Harris bipod and hope to one day upgrade to a Bobro or Atlas. 


The parts (pictured above) arrived with an instruction guide (not pictured).  On the left,  the front rail and, on the right, the oval nut plate with two socket head cap screws. The fiberglass stock on my M1A required significant fitting to accommodate the oval nut plate and, yeah, I probably took too much material off the inside of my stock, but I wanted to make damn sure that the plate, once permanently installed, would have zero interference with the op-rod. 


This was an interesting install and goes in two phases; the first part is slow and methodical (mainly because of all the Dremeling to fit the oval nut plate), the second part, fast and concise. I mainly used tools that I had on hand, but did have to purchase a 9/32 drill bit from Home Depot for $4. Tools used for the install:

         - Dremel bits from a sanding/grinding kit 
         - 9/32 drill bit
         - Dust mask, because you don't want to be inhaling fiberglass...
         - Eye protection
         - Painter's tape 
         - 5/32 hex key wrench
         - JB Weld Metal Epoxy or equivalent
         - Blue Loctite (pictured) or Red for permanence
         - Dremel tool
         - Dremel 1 1/2" cutting wheel (not pictured)
         - Drill (not pictured)
         - Vacuum cleaner with an extension wand or a portable handheld vacuum (not pictured)

First and foremost; safety, clear your firearm. Then disassemble your M1A, separating the stock and placing it in your work area. Please refer to my post on the Sadlak NM Spring Guide install for the correct procedure.

[1] Remove Rivets Holding the Sling Plate


My SA Inc. M1A fiberglass stock had rivets, as seen above. I chose to grind off the rivets from the outside as access to the interior was very limited with the 1 1/2" Dremel cutting wheel. I did not worry about marring the sling swivel plate as it would be hidden beneath the rail (see 4th picture below). 


Once I ground the rivets flush to the sling plate, I used a flat head screwdriver to pop off the plate. By doing this I noticeably bent the sling plate, d'oh! Not a problem, two pliers leveraged in the right position bent it back into place. The rivets were recessed and, although I wasn't concerned about marring the plate, I did not want to go too deep, thus the decision to pop off the sling plate with the rivets still partially intact. 


[2] Resize Rivet Holes 


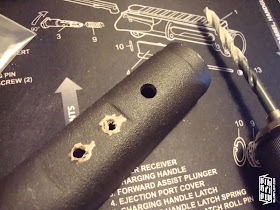
Using the 9/32 drill bit, I enlarged the holes that previously held the rivets by drilling from the inside out. The bit sliced through the fiberglass with minimal applied force. The fiberglass did slightly crack on the exit holes, therefore I would recommend drilling from the exterior to the interior (opposite of what I did) for a possible cleaner cut. The interior area will have to be Dremeled out for the oval nut plate, so any split material will ultimately be removed. Once drilled, I checked the holes for fitment with the oval nut plate (as pictured below).


[3] Modify Stock For Oval Nut Plate Installation


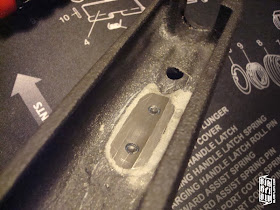
While I had the oval nut plate temporarily placed to review the fit from the drilled holes in section 2, I applied some painter's tape around it as a basic guide. This is where you'll want to bring out your dust mask and vacuum cleaner as it is a process; slow and methodical, Dremeling out the area, stopping, vacuuming out the fiberglass dust, gauging the depth, placing the oval nut plate into position for fitment review, then back to Dremeling.

This part also took the longest to complete, close to 1/2 an hour on my end. I did not want to duff it up, but feel free to go faster. A Dremel kit with a depth guide would have probably helped the process significantly, however, I do not know if the guide would fit on the interior of the stock. I did find a post on ARFCOM where someone did use one on his stock with success. Definitely an option to consider.


After the above photo was taken I removed the tape and Dremeled out the surrounding area to allow for additional JB Weld to be applied for the adequate bedding of the oval nut plate.


At some point I also decided to review my strategy and stopped to assess the step on the nut plate. I needed to remove more material, but I wanted to make it specific. I changed out the larger grinding bit with a smaller bit & proceeded to roughly grind out the area around the holes to accommodate the step on the nut plate.


As pictured above, fitment of the oval nut plate indicated I had reached the maximum depth, as any additional material removal would have resulted in the nut protruding from the base of the stock. This would not be desirable. Thus, Dremeling complete.

[4] Apply Epoxy & Work Fast!


After completing the Dremeling, I washed off the front-end of the stock to removed all the fiberglass dust. I toweled off the excess water and prepped for the final phase of the install. Get everything you need (5/32 hex key wrench and Loctite) within reach & ready to go, you will be working fast once the epoxy is mixed. 

Pictured above is the mixed two part epoxy applied to the interior of the stock. I took small pieces, stuffed them into position, then cut out the excess where the holes were with an Exacto knife. I then pressed in the nut plate, as pictured below.


I then immediately attached the sling plate/rail combo via the two socket head cap screws, partially screwing them in by hand, then quickly applied Blue Loctite (in retrospect, I should have used Red) on the interior threads, finally proceeding to tighten them into place with the 5/32 hex key wrench.


At this point the epoxy has begun to set. I took a flathead screwdriver and chiseled off the excess epoxy before it had completely set. I did not do any additional sanding.


Final notes. I buggered up a few things on this install, thankfully nothing irreparable, but hopefully it helps you out and provides you with some necessary information to make the right decisions for your installation. In the end it came out perfectly fine and the rail feels extremely solid.

Lastly, Sadlak is no run-of-the-mill company that deals in cheap garbage generically labelled as "mil-spec", they set an American standard in quality, so no need to play marketing games or use (what has become) frivolous jargon. The parts I have received from them and the service thus far has been superior. Buy direct and support a fine American company! And another reason I suggest buying direct, if you have any questions what-so-ever, just give them a call and they will gladly help you out.