After completing the design work and sizing, off to the laser engraver the 80% went along with the digital file. $130 and two days later, bam, the IZHMASH paperweight was born. Not a lower or firearm yet though.
[Click on images to enlarge]
With the 80% engraved and the limitless options of AR15 Lego components floating around in my head, I hunkered down and began my quest for parts. As Ghandi said, "Let the destruction of my daughter's college savings fund begin!" First up, finding a good barrel, which wasn't too difficult with all the great options now available. I was fortunate enough to scoop up a 10" barrel from Ballistic Advantage (BAMF), a fine specimen made from 4150 chrome moly vanadium with a QPQ corrosion resistant finish, more commonly known as melonite.
However, at this point I also decided to get the 80% anodized. If I had completed the 80% and then attempted to get it anodized, I would have had to find an anodizer with an FFL, not an easy quest. And, no, most anodizes who wish to stay in business will not do it while you wait. My understanding is the ATF has been shutting down places that had this policy, at least in San Diego County.
With the anodized 80% back in my hands, it was time to mill this sucka out and turn this inanimate object into a real life, fire breathing, ghost gunning, 30 rnds in half a second, FIREARM! And after a few hours of work, that's exactly what it became.
A test fit on the barrel with the Seekins gas block revealed that part of the Geissele 9.5" MK4 rail would need to be removed in order to access the regulator screw with ease.
After 5 minutes with the Dremel and some cleanup work with a file, it was GTG.
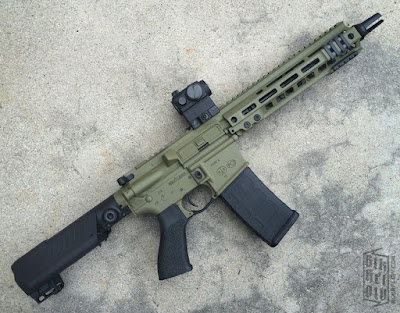
With that completed, I was ready to paint. I was feeling an OD green with a black combo after riding in a Sherman tank a few weeks earlier, so it was time to degrease the parts.
Aervoe rattle can is my go-to paint. Once parts are dry and degreased, I hit them with a light coat. They then cure for 48hrs, hit them again, then allow to cure for another 48hrs. Here is a write up on Aervoe from a previous blog post: blkrfldiv.blogspot.com/2015/03/aervoe-rattle-can-paintjobs
With all the parts dry, everything starts to come together.
FYI the serial number below the arsenal mark on the magwell has been Photoshopped out of all these photos. A serial number is not necessary, in fact no markings are necessary on a firearm built by a law abiding American, as "Federal law does not require a homemade gun to have identifying marks (such as a serial number), as long as it remains in the possession of the original maker. The ATF suggests that all homemade firearms be marked with a serial number (or distinguishing marks) as a safeguard in the event the firearm is lost or stolen, but requires it if the gun is otherwise lawfully transferred in the future." - criminaldefenselawyer.com
It is your right to build firearms, so get started building! But... also know the laws, especially in a place like Californiastan. Ask questions or google search your questions, better to ask a "dumb" question than be arrested for some asinine BS. Happy building, folks.


