About a week ago Geissele posted a sneak peak of the forthcoming ALG AK trigger with the following info:
Look what the ALG Elves are working on tonight! The new ALG Defense AK-47 trigger. The Lightning Bow's unique shape and position makes the AKT a transformative addition to an AK. See and shoot it at SHOT 2015.
Being a huge fan of the ALG QMS triggers for my AR15s, this is great news for all AK owners, like myself, who are always looking for options to improve one of the worst triggers on one of the most notorious and widely fielded small arms in the world. BLK RFL DIV will be venturing to the 2015 SHOT Show and I will definitely give this trigger a test.
Final notes. There are already some quality upgrades for the AK trigger, most notably, the Red Star Arms adjustable trigger, but this entrance into the AK market by Geissele/ALG should be interesting and I welcome it.
Wednesday, December 31, 2014
Tuesday, December 30, 2014
Crayons, Not Just For Kids
Marking your elevation and windage on the rear sight of your M1A can be done with an inexpensive and effective application of whiteout, enamel paint, fingernail polish, acrylic paint, or crayons. I recently ended up removing the terrible job I did at marking my rear sight with whiteout and decide to use a white crayon. Crayons are easily applied and clean up is a breeze, not to mention you'll be surprised at how resilient the application is. If you don't like the end result, simply use a toothpick and toothbrush to remove the crayon.
First, make sure your firearm is unloaded; rack the charging handle back, visibly & physically inspect the chamber, once cleared, allow the charging handle to go forward, and place the safety on if you haven't already done so.
Next, clean the rear sight where you plan on applying the crayon with some denatured alcohol. I use a q-tip and rag. You don't have to use too much, just give it a few wipes, and make sure the gunk is out of the crevices you intend to highlight.
Besides the actual crayon, the only other items you'll need are paper towels and more q-tips.
First, make sure your firearm is unloaded; rack the charging handle back, visibly & physically inspect the chamber, once cleared, allow the charging handle to go forward, and place the safety on if you haven't already done so.
Next, clean the rear sight where you plan on applying the crayon with some denatured alcohol. I use a q-tip and rag. You don't have to use too much, just give it a few wipes, and make sure the gunk is out of the crevices you intend to highlight.
Besides the actual crayon, the only other items you'll need are paper towels and more q-tips.
Get right into it, don't worry about the mess because it's easily cleaned up, just jam that crayon into the crevices.
Once you have a good amount of wax built up into the rear sight markings, wipe the excess away with a dry q-tip and dry paper towel.
Final notes. It's that simple and, again, if you don't like it, just remove it with a wooden toothpick and an old toothbrush.
Monday, December 29, 2014
BLK RFL DIV Shirt Giveaway Contest
We are very honored to have Mr Guns n Gear rocking one of our t-shirts and, along with that, there's a giveaway for one lucky winner. Please watch the video for contest rules to be eligible for the drawing. Basically, just comment on the Mr Guns n Gear's youtube video promoting the giveaway and like our Facebook page, it's that simple.
Click on the youtube icon on the lower right of the video to make the jump.
Mr Guns n Gear's youtube channel has a lot of excellent & informative reviews. I highly recommend browsing through his videos and subscribing.
Final notes. Thank you for all your support!
Click on the youtube icon on the lower right of the video to make the jump.
Mr Guns n Gear's youtube channel has a lot of excellent & informative reviews. I highly recommend browsing through his videos and subscribing.
Final notes. Thank you for all your support!
Monday, December 22, 2014
Emdom's Multi Calibre Mag Pouch
It's nice to be able to grab your gear and know that if you're going to be running 5.56, 7.62x39, or 5.45x39 for the day you don't have to worry about changing out the mag pouches to accept your mags. There are a few viable options on the market right now that can accomplish this and I have been using Emdom / MM's AK / M4 double magazine pouches for about a year & a half now. MM stands for Military Morons and the pouch was a collaboration between the two groups, one of many collabs, thus the co-branding. MM is well known, but if you haven't heard of the site or name, it's a great website with a ton of excellent reviews on gear & accessories.
The mag pouch utilizes a large velcro closure flap that is fully adjustable from the interior to accommodate different magazine types and adequately shelters stowed mags from the elements. If debris or precipitation do enter the interior of the pouch, there is a grommet on the bottom to allow said debris and water to exit. This minor detail does make a difference. The pouch also features a passive external elastic retention band to mitigate juggling while on the move.
The Emdom/MM magazine pouch is easily mounted on your web gear with two long MALICE clips (as pictured up above) that are included with the pouch when purchased.
5.56x45mm Magpul PMAGS up first.
Emdom's website states that the mag pouch was designed to run with 'bullets up', especially when running AK mags and specifically because of the snag potential of the rear locking lug. I have always run my mags up-side-down or 'bullets down & forward (facing)' and I have not had an issue, so I will continue running them 'bullets down & forward'.
Final notes. You can tell that the 3 Bakelites pictured up above have zero floorplate wear and I admit they were just for show. Why, because they're damn sexy, that's why and contrasting them with modern gear just looks good IMO. The ones I do run when shooting featureless in CA & freely in NV or AZ, are old sanitized TULA mags that I've had for years. They've held up well.
The mag pouch utilizes a large velcro closure flap that is fully adjustable from the interior to accommodate different magazine types and adequately shelters stowed mags from the elements. If debris or precipitation do enter the interior of the pouch, there is a grommet on the bottom to allow said debris and water to exit. This minor detail does make a difference. The pouch also features a passive external elastic retention band to mitigate juggling while on the move.
The drainage grommet and elastic band around the middle of the pouch for mag retention is visible in the picture above. Additionally, there is no shortage of velcro, allowing for full adjustability.
Above is the interior part of the flap that can be adjusted to accommodate a diverse range of mags.
3 sets, 4 mags in each set for the two pouches I have on my battle belt. In order of appearance: 5.56x45mm Magpul PMAGS, 7.62x39mm Izzy Bakelite mags, and 5.45x39mm Izzy mags.
5.56x45mm Magpul PMAGS up first.
The 7.62x39mm Izzy Bakelite mags. Something to consider, for the picture I had the mags in the back slide in last, however, if you pull from the front first, you should load the front mags last. The reason being the overlapping of the floorplates. The same attention to the stacking of the floorplates should be given if you run your mags 'bullets up'.
5.45x39mm Izzy mags. Same note on stacking the floorplates as with the Bakelites.
Final notes. You can tell that the 3 Bakelites pictured up above have zero floorplate wear and I admit they were just for show. Why, because they're damn sexy, that's why and contrasting them with modern gear just looks good IMO. The ones I do run when shooting featureless in CA & freely in NV or AZ, are old sanitized TULA mags that I've had for years. They've held up well.
Thursday, December 11, 2014
The BRD store is LIVE!
Yep, the BLK RFL DIV store is LIVE! There's a link over on the right side, if you're on Blogger, to check out some of our goods or just click HERE. If you're reading this on the blog feed on the BLK RFL DIV website, thank you for visiting!
And to celebrate our grand opening, we are offering free shipping for t-shirts & hoodies on all domestic orders.
Send me any feedback you have, especially if you have any issues checking out or with the online store interface. I have no idea why but the products are greyed out on my phone... trying to fix that now, not sure that the template I'm using can be adjusted.
Final notes. It has been an experience; from getting the business set up, all the paperwork and figuring out who needs what (an FFL must be a nightmare), doing all the artwork myself, learning what works & what doesn't, figuring out a decent online store platform to use, shipping, figuring out shipping is somewhat unbelievable, and then my poor daughter (2 years old) sick with a stomach bug for the past few days and I'm pushing to get it all released. Well it's done and I'm sure there are areas that can be improved, because I know there is a lot more that can be done, but it will evolve. I hope that any and all customers enjoy what we have done with the t-shirts and there's more to come! I need a beer now.... phew.
Send me any feedback you have, especially if you have any issues checking out or with the online store interface. I have no idea why but the products are greyed out on my phone... trying to fix that now, not sure that the template I'm using can be adjusted.
Final notes. It has been an experience; from getting the business set up, all the paperwork and figuring out who needs what (an FFL must be a nightmare), doing all the artwork myself, learning what works & what doesn't, figuring out a decent online store platform to use, shipping, figuring out shipping is somewhat unbelievable, and then my poor daughter (2 years old) sick with a stomach bug for the past few days and I'm pushing to get it all released. Well it's done and I'm sure there are areas that can be improved, because I know there is a lot more that can be done, but it will evolve. I hope that any and all customers enjoy what we have done with the t-shirts and there's more to come! I need a beer now.... phew.
Friday, November 28, 2014
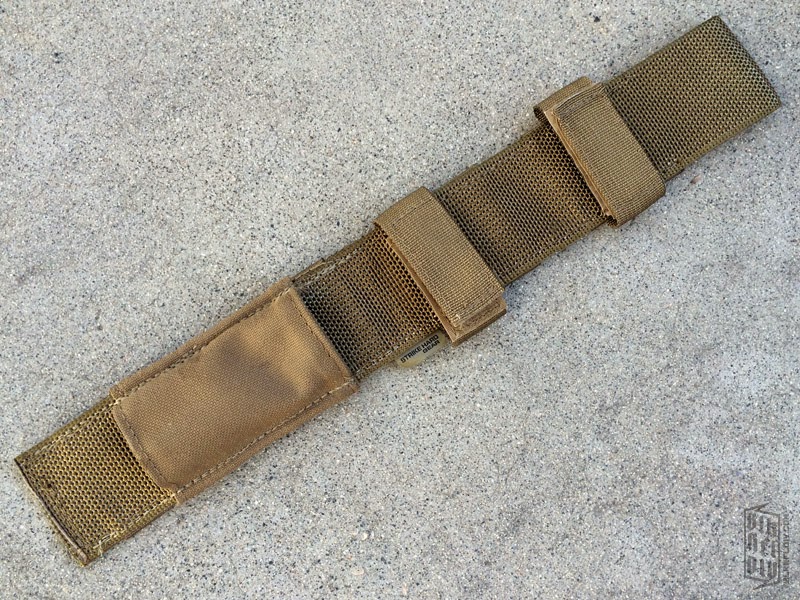
Strike Hard's AKM Bayonet MOLLE Sheath
I had this great idea following the purchase of my latest AK bayonets, I was going to design & make some MOLLE sheaths from some left over material I had for my AK bayonets. I checked the interwebz to see what solutions were currently out there, if any at all, and, sure enough, someone had already done it. I found Strike Hard Gear's AKM MOLLE sheath and, for $23 shipped, I postponed my endeavor and picked one up.
[Click on images to enlarge]
The sheath arrive a couple days later (as it was in stock and did not have to be made per my order). All materials used are top quality, double stitched, plenty of PALS webbing, and solid like the AK bayonet it was made to carry. Installation is straight forward as the design is efficient in it's simplicity: slide the bayonet scabbard into place under a large piece of fabric and then fasten two velcro straps, one for the scabbard and the second is for the bayonet grip, for additional retention. No doubt about it, the Strike Hard AKM sheath is a great American Made update for your commie pig sticker.
However, I had a problem with mine, the lower retention fabric was too tight and, even though I tried to Hulk Hogan it in there, it would not slide in. I contacted Strike Hard and Todd immediately responded. I shipped it back and, shortly thereafter, it came back to me with just enough slack to allow the scabbard to easily insert while maintaining sufficient retention. I'm a fan, because good customer service does make a difference. Nothing better than an excellent American made product that is back up by the company's (Strike Hard's) excellent customer service.
The next step was figuring out where this mutha was going to go, on my PC or my battle belt....
My battle belt allows for quick access to the interior webbing belt and the SHG AKM MOLLE sheath has a 1.75" belt opening.
The belt access opening on the left side seems to be the optimal location on the battle belt. No room up front, because of my mag pouches and I decided to avoid the right side, because of my holster/secondary & additional pouches, but mainly because it could impede quick deployment of my secondary. However, I have been running my TOPS Fieldcraft Knife on the left side, though, with the AKM bayonet, I had a change in my thought process. In the unlikely scenario (never say never) I needed to attach my bayonet to my SGL-31, I would retain control over my firearm with my right hand and maneuver with my left, thus making the left side location optimal. In theory, of course, as I have not run this set up yet. I could decide the complete opposite later on and this is something you have to test on your own, "what works for you?"
As pictured below, I tried the spot behind my dump pouch, but this was not a viable option IMO. Reason one, sitting in vehicle or anywhere, the bayonet is in an undesirable location and, two, obstruction of the dump pouch when in use.
Now let's take a look at it on my Shellback Banshee PC. The AK-74 bayonet is not short and stubby, measuring in at 13.5" OAL, with the SHG sheath coming in at ~13.75" loaded. As pictured below, it takes up a lot of vertical real estate when compared to the Gerber LMF II.
I attached the bayonet setup to my Shellback Banshee PC with two Blackhawk! speedclips for a quick review of the system. Malice clips would be preferable (shoulda, coulda, woulda picked up a couple from SHG), because the speedclips slipped out when I removed the bayonet to attached to my SGL-31. If you look closely in some of my next pics, you'll notice the slip, it's pulled up and to the left. However, this slip could have been attributed to of my quick installation.
Final notes. American made, American badass gear. Can't wait to run it and need to go shoot soon. I've been working my ass off trying to get my tees and accessories out for the BLK RFL DIV line so have been stuck indoors for the past few weeks. Strike Hard and the many other proud American small business' get all my respect and I hope to follow in their footsteps.
Thursday, November 27, 2014
To the screenprinters, Batman!
Spent some time at the screenprinters yesterday getting the first batch of tees & hoodies done. Another session next week and then I should be able to go live with the BLK RFL DIV store. Been working on this stuff for months and it's somewhat surreal watching it all become a reality in one day.
Final notes. None of this would have been possible without the support & help from all of my friends and family, especially; Eric F., Jeremy, Ian, Blair, Ky, Eric H., Berkley, Mr Juantanamo, and last but not least, my beautiful wife and daughter. Let's see what happens, let the journey begin.
Subscribe to:
Posts (Atom)