Thursday, October 16, 2014

Rail Installation On Polymer AK Handguards

Following is a DIY, pic-heavy overview on how to add a Magpul rail section to polymer AK handguards. I will focus on adding the rail section to the gastube handguard, where the addition of the Magpul polymer rail requires the least amount of modification. Fitment to the lower handguard would require extensive modification, especially in relation to the interior, metal heat shield. The lower handguard is definitely a viable option for mounting accessories, but that is not the directive of this entry.

Before doing any modifications, consider the type of light system you would like to deploy; will it be a momentary on/off button, a continuous light, do you want to use your thumb or index finger to manipulate the light system, will you have a pressure switch, how is the stream on the light you plan to use, will it blow out your front sight, should it be placed above, below, or to the side of the handguard? Questions to consider before you do anything.

[1] Remove the Gastube Handguard


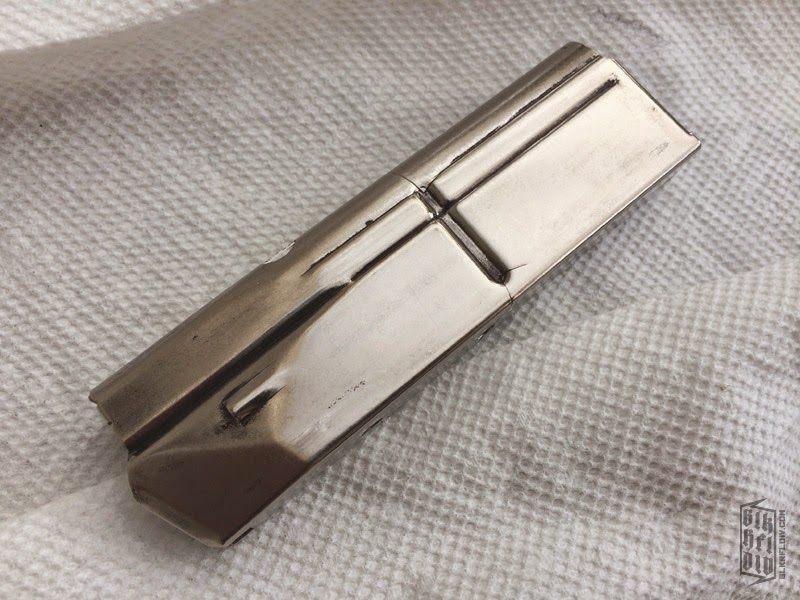
First and foremost, safety is paramount, so secure your firearm and be sure it is completely unloaded. Once safe, break down your AK and remove the gastube.


Place the gastube in a table vice and rotate the polymer handguard off using both hands (I had to hold the camera with my other hand in the pic above).

If you don't have a table vice, it might be a bastard to remove or it could easily slide out. One way to do it is by holding the metal gas tube with one hand and then grasp the polymer handguard with the other hand, holding it out in front of you like you are holding onto the handle-bars of a bike, then rotate the two parts in opposite directions with your hands. Wearing a pair of gloves will help to get better traction.

[2] Mount the Rail Section


A 2 slot MOE RVG rail section is ideal for mounting on the gastube handguard, because of it's size, as you really don't need anything larger to mount a light system, and specifically because of the size of the mounting brackets. The standard Magpul rail sections, as pictured above on the left side, come with mounting brackets that are twice the size and not a desirable option IMO. However, I did use these brackets to mount a 5 slot rail section on my DRACO (see last pictures on entry) and the brackets make contact with the gastube. A Dremel cutting wheel will effectively reduce the size.


Next, figure out where you want to place the rail section. I opted for the front, right side of the handguard.

If you want it on the left side, so that you can use your thumb to turn the light on/off, be aware of the sling attachment and if this location will be an issue. As previously mentioned, I strongly suggest placing you light system on the handguard prior to doing any mods to assess if this is even a direction you want to go for mounting your light.


Take a pencil and mark the areas that need to be drilled out.


A drill bit will easily punch through the polymer handguard. In fact, a X-Acto knife will also accomplish the job, as pictured above. Limit the amount of material you remove, because you want to allow for a snug fit for the screws to reduce any wobble.


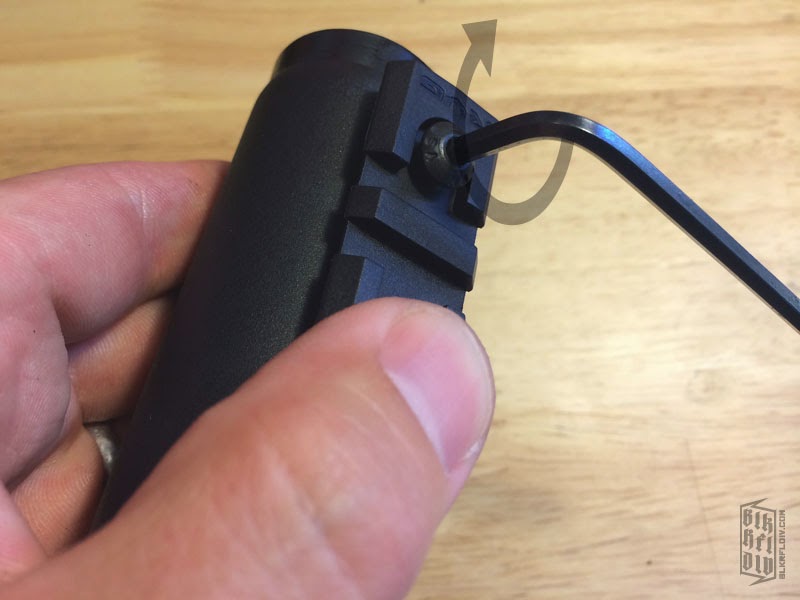
Start the screw off first, don't worry about the interior bracket yet. Once the screw is in place and slightly protruding on the opposite side, set up the interior bracket, and continue tightening the screw. 


Don't tighten down the first screw all the way, wait until you have both screws and both brackets in place before doing a final tightening. Do not over tighten, it is not necessary considering the screws (should) have thread locker on them. 


[3] Reassemble & Verify Fit


If everything is firmly in place and you are satisfied with fitment, reinstall the handguard onto the gastube. It would be desirable not to scratch up the gastube and you can accomplish this by making sure that the rail section is rotated in at the end of the rotation. As you can see in the picture above, the rail section is on the opposite end of the rotation, thus it slides on last. Additionally, you can use a Dremel tool to cut down the ends of the screw threads, possibly even polishing them down. I would recommend this.

As seen below, it was trial and error for me, those nicks could have easily been avoided. Not sure if you can make it out in the picture, but the screw ends are not contacting the gastube. Furthermore, the screws were not ground down as suggested in the previous paragraph. They were Dremeled down on my DRACO.


The gastube was then reinstalled onto my SGL-31 and a light system mounted.

[Click on images to enlarge]


As seen in the images above, the locking mechanism for the VLTOR light clamp has to be on top in order to be accessible. This may not be aesthetically pleasing for many, as well as, an undesirable hang-up point. The bulge on the front end of the lower handguard makes it impossible to tighten the light mount from below.

Following are pics of an Inforce WML mounted on the 2 and the 5 panel rails. I also included a couple of of my cheap POS handgun light mounted on the 5 slot panel on my Draco. If someone has a SureFire X300U that they can send me for testing, please do!  


Above, picture of the Inforce WML light mounted on the 2 slot rail section.


Above, picture of the Inforce WML light mounted on the 5 slot rail section.


Picture of the handgun light mounted on the 5 slot rail section.


Overhang on the handgun light for the 2 slot rail section as pictured on my SGL-31.


And, lastly, a look at the two rail section options side-by-side.

Final Notes. There are a lot of quality aftermarket rails that are available for purchase that can accommodate optics and light systems. There are also cost effective barrel clamps that can be used to mount accessories. RS makes a picatinny barrel clamp, the BM-1, which retails around $60. I believe UTG makes a couple of low-cost options, but I have not tried any of them. I love the fit & feel of the standard polymer handguards and I do not use VFGs or AFGs on my AKs or any of my ARs. I also not require optics to be mounted on the front handguards of my AK variants, thus I opted for this setup. It may or may not be the best solution for your platform, but now you have all the information you need to make a decision on how to proceed. Spend $5 on a 5 slot panel and save the rest of the money for an solid light system? You decide. Set it up the way you like, if it works, run it, if it doesn't, change it. Good luck.

Tuesday, October 14, 2014

Sharpie + Stainless Steel Mags

"Not everything suggested on the interwebz should be undertaken" - Ghandi. Words of wisdom. I have stainless steel mags for my FNP-9, no issues & they have functioned perfectly. However, from a tactical perspective, a beacon if the sunlight catches them (while in a mag pouch) and a dead give-away to your position. So I searched the internet for a viable solution. One recommendation was to send them off to have them Cerakoted, the best price I found was for $10/mag (not including shipping). Another internet guru suggested a Sharpie.... a Sharpie, that's a horrible idea! So, I bought a $3 Sharpie and tested this random forum suggestion.

[1] Applying the Sharpie


First, the mags were prepped by wiping them down with a paper towel that had a light coat of Krud Kutter. I then used a paper towel dampened with water to remove the Krud Kutter. I did not break down the mags, but went straight at em with the Sharpie.


Looked great after initial application & none of the underlining blue hue you usually see from a Sharpie when applied to a metal. I Sharpie'd all my FNP-9 mags, 5 total. 

(And, yes, that is a cheap POS light on my FNP-9, but it has held up very well.)

After applying the Sharpie, I let the mags sit for a couple of days and then loaded them up. My hands exhibited a lot of Sharpie residue from handling them while loading.


I pulled 2 mags aside and applied clear sealers (that can be found at any big box hardware store), as pictured below, to see how they would hold up to the general handling and use. FYI, the mags picture are before application and all shine was eliminated with the application of the sealers selected. 


RUST-OLEUM 2X Ultracover Matte Clear and Krylon Satin Finish were applied to the 2 mags accordingly. I then let the mags sit for two days before handling. The Krylon Satin had the best finish, while the RUST-OLEUM had a thicker, textured finish. A textured finished might inhibit a clean mag drop, so not desirable IMO.  I took some brown paper (grocery bag) to it to smooth it down. The sealers definitely limited the amount residue being transferred to my hand, however, they did not hold up to a range trip, though they did fare better than the untreated mags.

[2] Range Trip


I sent about 250 to 300 rnds downrange, loading up the mags with 2 to 5 rnds, transitioning from mag pouches and the table top. This definitely tested the resilience of the Sharpie application. The 3 untreated mags are easily distinguishable from the 2 treated mags as they have a gloss sheen to them. The mag watermarked [1] had the Krylon Satin Finish and the mag marked [2] had the RUST-OLEUM finish. You can make out the slight difference in finish between the two, with the RUST-OLEUM mag having more texture.

A possible question, did the residue that was flaking off on the interior of the magwell create any issues? No, none that I experienced. The mag with the RUST-OLEUM finish did hang up slightly at one point, but it was easily removed with a solid flick of the wrist. 

All in all, I was satisfied, but decided to remove the Sharpie application on 4 of the mags, leaving only the Krylon mag intact, at least to see how long the Sharpie treatment would remain. 

[3] Removing the Sharpie Ink / Apply Aervoe


The mags were dissembled this time. I used steel wool 0000 to remove the Sharpie finish, only because I was going to apply black Aervoe spray paint. It is my go-to rattle can paint and I have used it with success on most of my firearms. If I was not going to apply another treatment, I would have wiped them down with paint thinner or denatured alcohol so as to avoid damaging the stainless steel finish. 


After removing the ink with steel wool, the mags were washed off and dried.  All handling was limited after the wash to avoid oils from my hands being transferred onto the mag bodies, oils which could possibly compromise the fastness of the Aervoe paint. The mag bodies were then stuffed with paper towels and a wire (coat hanger) was inserted for handling & hanging. 


Aervoe is great stuff, but it will scratch and is not impervious to wear & tear. It has a "normal" feel after drying, none of that sticky, tackiness some rattle can paints can have to the touch. It's best applied on a warm sunny day. I usually put the can and item in the sun for about 1/2 hour prior to application to absorb the heat. Shake the can for about a minute, though you should probably shake it longer, just make sure the ball is rolling freely inside the can. I always apply several coats for firearms and accessories over the course of 72hrs, however, for the mags I went really light with only one application. I made sure I had decent coverage, I did not oversaturate any areas, and then hung the bodies up in the sun all day. I'm currently on day two of the drying process and will add an update once I reassemble and repeat another range trip.

Final notes. Sure, it was worth a shot, but I'll stick to using my Sharpies on my illustrations and targets. And so should you.