- Hardcoat anodized 6061 aluminum & melonite coated steel construction
- Patented ADM Auto Lock System for no tool adjustment and repeat zero locking
- Weight 6.4 oz
- 100% made in the USA with lifetime warranty
The mount comes with a hex wrench for the mounting screws and nothing else, simple, just the way I like it.
[Click on images to enlarge]
[1] Checking Fitment of the MI Mount
Before you proceed, visually & physically inspect your firearm's chamber to ensure it is clear/safe before working with it.
The first step to installation is to slide the mount onto your AK's receiver side rail, scope mount to check the fit and to see if it needs to be adjusted. Release the ADM lock button, flip the lever into the open position, and slide the MI mount onto the receiver side rail.
Next, flip the ADM lock back into the locked position. If it doesn't want to move into the locked position it is because the tension is too tight . Do not attempt to force it, it needs to be adjusted.
If the lever does go into place, lock it down. Now push from the front of the mount toward the buttstock of the AK to see if you get any movement. If the ADM mount locks into position and the mount is solid, no adjustment is necessary, but if the ADM lock cannot lock-out because the mounting mechanism is too tight or the mount is loose and starts to slide back & off the receiver side rail, then you need to adjust the mounting mechanism.
[2] Adjusting the MI Mount
Adjustment is very easy. Remove the mount if it is still attached to your AK variant. Take the mount and depress the ADM lever while it is in the unlocked position. Keeping it pressed in, rotate the adjustment nut on the opposite end one position or one flat either clockwise or counter-clockwise to either loosen it or tighten it. It takes only a slight rotation to adjust for correct fitment.
Repeat the steps from section [1] until the mount locks on firmly and easily.
[3] Mounting Your Optic
Once you have correctly adjusted the MI side mount to fit the receiver's side rail, leave it in place on the receiver. If you haven't done so already, remove the screws & the top mounting bracket with the supplied hex wrench. Place your optic in the mount, put the bracket back on, and lightly tighten the screws into place, do not tighten them down. Now you want to verify everything is fitting correctly before committing to the installation.
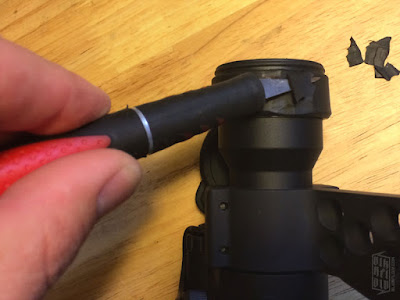
For the Aimpoint PRO, the plastic objective cover was contacting the dustcover. As seen below, the easiest solution was to remove some material from the flip cover. I used an Xacto blade and was not overly concerned by the appearance.
I remounted the Aimpoint and removed the dust cover to verify adequate clearance.
With everything fitting correctly, it was time to bring out the Blue (removable) Loctite.
Loctite was applied to the screws and they were lightly reinstalled.
With the screws lightly installed with Loctite, I verified the optic was level, both with a small bubble level and by eye. The problem with the Aimpoint PRO was there wasn't a flat surface area to get a good reading on the bubble level, so I really had to eyeball it by making sure the planes were parallel as seen in the picture above (click on image to enlarge).
Bring out the torque wrench! Yes, you want to use a torque wrench as you never want to just tighten your optic down into place without knowing the correct torque specs. Anyone who says to just tighten it down "monkey tight" is not someone you want advice from. For the MI mount it is between 15 (minimum)- 20 (max) in/lbs.
Crisscross tighten the screws into place, slightly tighten one screw down, go to the opposite and diagonal screw, tighten it slightly, etc.... You're done with the install.
[4] Zero Your optic
Sight picture: the irons have a low 1/3 cowitness, perfect IMO, because I can adjust based on my DOPE with hold overs and without any obstruction, specifically, the fixed front sight.
I took my SGL 31 to a local indoor range and confirmed my zero. The first target I fired at was set at 15 yds and was very high & to the right. I adjusted my optic accordingly. I then set the target out at 25yds and confirmed my zero with a 3 shot group, as seen above.
Final notes. Will it return to zero? Yes, the MI 30mm mount has a near perfect return to zero (nope, I don't have an MOA calculation in difference) for the Aimpoint PRO. In my previous post (LINK) about cleaning a firearm after a range session using corrosive ammo, I completely removed the red dot prior to cleaning. A week later during my following range session I reconfirmed my zero and the group was exactly the same as the target pictured above. The MI mount is very dependable and I highly recommend it.


